Admin Interface
The admin interface allows the website administrator to manage the data for the web application. However, before you can use it you must tell Django which data models you want managed and you must setup the admin interface.
First, check the file mysite/urls.py, and check whether the following line exists:
urlpatterns = [
    path('admin/', admin.site.urls),
]
This tells django that if someone opens the /admin/ path on the web application, they will be shown the login screen for the admin interface. If this line does not exist in the urls.py file, this means that django was not setup to enable the admin interface. By default, when using the replit django template, the admin interace will be configured for you.
Now try to login. You will notice that you cannot signup and you do not have access to the admin interface. To use the admin interface you need to create an admin user. To do that we need to make sure that the following is done:
- The tables in the database corresponding to the models in our Django project are created. There is more that Django is doing for us besides the blog model. It manages the authentication for the admin interface and will need to create tables for storing the credentials of the admin used. If you haven’t performed the migration step, now is the time to do it so Django will create the database tables used for our models and for authenticating the admin user. For this step we must run the following shell commands:
python manage.py makemigrations
python manage.py migrate
The first command will prepare all the SQL commands to create the database tables for our project. The second shell command will execute it and create the tables.
- Once the database is properly configured we can then create the admin user using the following shell command:
python manage.py createsuperuser
You will be presented with instructions, follow them to create the admin user and use the information to login to the admin interface. You will notice that the Posts for our blog are not there. So let’s tell the admin interface that we want to manage the Posts in our blog app using the admin interface.
For that, open blog/admin.py and update it to include the following:
from django.contrib import admin

from .models import Post

admin.site.register(Post)
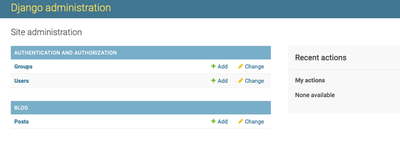
Here we imported the Post model, then registered it with the admin site. This tells Django that we want the Post model to be managed by the admin interface. Now login to the admin interface, and you will see that you can add/edit/delete blog posts from the admin interface.
You can find our more on the admin interface by referring to Django’s documentation on the admin interface