Data-Driven Views
Data-Driven views are just regular views in Django, except that they use the model later to fetch/store data from the database.
With data-driven views, you take advantage of the Django ORM to build views that perform the basic CRUD operations:
- Fetch data (Focus of this section)
- Store data
- Update data
- Delete Data
In this section, our focus will be on building views that displays data (The fetch/read operation). In later sections, we will cover the other operations.
The fetch operation is necessary to read data from a database before it can be displayed on screen. Views that display data can be categorized into either views that display:
- A list of objects (known as list views).
- details of a single object (known as detailed views).
A typical web application will display list of data (e.g., posts, products, students …etc) and allow the user to filter, sort, or choose to display a single item in more detail. In our blog application, our goal is to display first a list of blog posts titles, where the reader can choose on of the posts to display in more detail for reading.
Blog Post List View
First Step:
As with any new view we want to create, we start with the view function:
from django.shortcuts import render
from .models import Post


def list_posts(request):
  posts = Post.objects.all() #1
  context = {
    'post_list': posts, #2
  }
  return render(request, "post_list.html", context)
The code is identical to a regular view in Django, so we will describe only the new lines related to fetching the data:
- Line #1: This is the statement that instructs Django to fetch all posts from the database. It consists of the following parts:
posts =: This is the variable that will hold the data fetched from the database. Since the data could include multiple posts, it will be a list of post objects. Everything you know about python lists applies here, but because it also allows for additional commands, it will be known as a QuerySet.Post: This is the Post model. It means the command we are issuing to Django applies to the Post objects only.objects: This is known as the model manager. All the commands that we can perform on the database table that contains the Post information is found under this objects model manager. When you read the linePost.objects, it should mean to you that we are performing an operation on all the Post objects (or records) in the database.all(): This is the fetch operations. We want to fetch all Post objects. Later we will see that there are other function such as filter, that allow us to filter specific objects from all the Post objects in the database.
- Line #2: Now that all the Post objects are stored in a list variable named
posts, we want to deliver this data to the template so the template can display it. As we did with previously when using templates for regular regular Django views
Second Step:
After creating the view, the next step is to wire the view to a url path. Since we previously created a urls.py specific for our blog app, we just need to update the blog/urls.py file to associate our list_post view with a path:
from . import views
from django.urls import path

urlpatterns = [
    path('', views.list_posts), #1
]
Code explanation:
- Line #1: We placed all the paths for our blog url under the main path
/blogwhen we improved our app urls. Therefore, associating a view function inblog/urls.pywith an empty path means that it will be associated with the main/blogpath only without any part after it. So to get the list, we access the path/blog.
Third Step:
Now all that remains is to create the template file post_list.html that we referred to in list_posts view. We must place the file in /blog/templates/ and create the directory templates if it does not exist.
IMPORTANT NOTE: Django is case sensitive. The templates directory must be named templates and placed inside blog directory.
This is how blog/templates/post_list.html will look like:
<!doctype html>
<html lang="en">
<head><title>Post List</title></head>
<body>
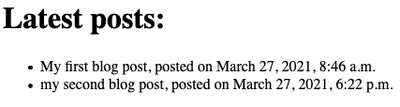
<h1>Latest posts:</h1>
<ul>
{% for post in post_list %}
<li>{{ post.title }}, posted on {{ post.created_on }}</li>
{% endfor %}
</ul>
</body>
</html>
We placed our list of post objects in the slot post_list when we constructed the context dictionary in in list_posts view. Since the posts objects are in a list, we can use the template for loop to loop over them and display them as an unordered list. The result is:
Database Queries
Remember this line from views.list_posts:
posts = Post.objects.all()
This line is called a query. A query is an operation used to fetch data from a database. It is however a simple query and fetches all the posts in the database. What if we need a specific subset of the posts that match some criteria. For that we used filtered queries.
Filtered Queries
To perform filtered queries we replace all() in our query with filter(). The filter function allows us to use the lookup query syntax to specify the conditions in which we select our Post objects. Here is a filtered query where we select all Post objects that have the status value 1 (which means they are published, see the models.py file for details)
posts = Post.objects.filter(status=1)
In this query, status is the name of the field and 1 is the value we are interested in. This is a lookup query where we perform exact value matching and the lookup syntax is simple:
field=value
- Notice we use =, not ==, this is very important
To perform more complex queries, you will have to use the lookup query functions and a slightly different syntax:
field_name__lookup_function = value
After the field name in your query, you use double underscore __ then add the special lookup function. The list of lookup functions can be found in the Django documentation.
The choice of the lookup function will depend on the type of data in the field you are querying and the matching operation you want to perform.
Queries on String Based Fields
These include CharField, TextField, SlugField, URLField, and EmailField. The main lookup functions you can use are:
| lookup function | Description |
|---|---|
| contains | Looks for all objects in which the queried field contains the lookup value |
| icontains | same as contains but case insensitive |
| exact | Looks for all objects in which the queried field contains an exact match of the lookup value |
| iexact | same as exact but is case insensitive |
| startswith | Looks for all objects in which the queried field starts with the lookup value |
| istartswith | same as startswith but is case insensitive |
| endswith | Looks for all objects in which the queried field ends with the lookup value |
| iendswith | same as endswith but is case insensitive |
Usage Examples
To fetch all posts with the word ‘first’ in the title using case insensitive search:
Post.objects.filter(title__icontains='first')
To fetch all posts in which the body ends with the sentence thank you. using case insensitive search:
Post.objects.filter(body__iendswith='thank you.')
Queries on Numeric Fields
These include IntegerField, DecimalField, and FloatField. Typically we would use exact matching when we look for a specific value, for example:
posts = Post.objects.filter(status=1)
status in the previous query is an IntegerField, and so we fetched all posts in which status is 1.
However, if we want to perform comparisons, we use the comparison lookup functions:
- gt: Greater than
- gte: Greater than or equals
- lt: Less than
- lte: Less than or equals
Example Usage
Imagine for example we have a web application with a Student model where we want to fetch all 3rd year and above students, we need to find students in which the value in academic_year (integer field) is greater than or equal to 3. The query would look like this:
Student.objects.filter(academic_year__gte=3)
Specific Queries on Date/Time Field
To perform exact lookup you can use any of the following lookup function or a combination of them:
| __year | Specify the lookup year |
|---|---|
| __month | Specify the lookup month |
| __day | Specify the lookup day |
| __hour | Specify the lookup hour |
| __minute | Specify the lookup minute |
| __second | Specify the lookup second |
Example Usage:
- To fetch posts created in the year 2020
Post.objects.filter(create_on__year=2020)
- To fetch posts created in January 2020:
Post.objects.filter(
  create_on__year=2020,
  create_on__month=1,
  )
- To fetch posts created in 23rd of January 2020:
Post.objects.filter(
  create_on__year=2020,
  create_on__month=1,
  create_on__day=23,
  )
- To fetch posts created in January, regardless of year or day :
Post.objects.filter(
  create_on__month=1,
  )
- To fetch posts created in at 2am, regardless of date:
Post.objects.filter(
  create_on__hour=2,
  )
- Django uses 24 hour format, so to fetch posts created in at 2pm, regardless of date:
Post.objects.filter(
  create_on__hour=14,
  )
Range Queries on Date/Time Field
To specify ranges, whether its dates/times before/after a specific point in time or dates/times within a specific range, we must use python datetime library to represent dates/times. This would ensure that the date/time is represented correctly and in a standard format and leaves no room for doubt as to what date is being referenced. So example, some countries would put the month before the day, while others would put the day. Some programmers might use 2 digits for the year while other would use 4. Python datetime library would force a specific format and allow for additional useful operation like datetime arithmetic.
Once dates/times are represented using Date/DateTime objects, we can easily find older dates using comparisons such as > or <. Older dates will always be smaller < more recent date. Therefore to find objects that come before a specific point in time, we use the __lt lookup to compare against that point. for example, to find all posts created before May 3rd, 2019 our query will look like this:
import datetime #1
date_before = datetime.datetime(2019, 5, 3, 0, 0, 0) #2
posts = Post.objects.filter(created_on__lt=date_before) #3
Code explanation:
- Line #1: We will need to import datetime library to create Date or DateTime objects
- Line #2: Here we are creating a DateTime object to represent May 3rd, 2019. The last 3 zeros or to represent time. The zeros are optional. The object is stored in the variable
date_before - Line #3: This is the actual query, we are looking for all posts with the value of created_on less than the
date_beforeDateTime object we created (May 3rd, 2019).
We can also compare to Date objects that exclude time. However, to compare a DateTimeField to a Date value we add the __date lookup function to force date comparison only. Let’s also show how we can look for date this time AFTER May 3rd, 2019:
import datetime
date_before = datetime.date(2019, 5, 3) #1
posts = Post.objects.filter(created_on__date__gt=date_before) #2
Code Explanation:
- Line #1: Notice how we create a Date object this time and will be looking up a DateTime field.
- Line #2: Since created_on is a DateTime field we need to force it to date comparison because we will be comparing to a Date object, so we use
created_on__date(this will ignore the time) and the operation is__gtto find posts after May 3rd, 2019.
Using the same concept, we can compare of a date is in the past or the future by comparing to:
datetime.datetime.now()for DateTimeFieldsdatetime.date.today()for DateFields
Here is an example:
import datetime
past_appointment = Appointment.objects.filter(
  scheduled_on__lt=datetime.datetime.now()
  )
future_appointment = Appointment.objects.filter(
  scheduled_on__gt=datetime.datetime.now()
  )
To lookup dates within a range, we only need to specific 2 points in time and use the __range lookup function instead of __lt or __gt. For example, if we want to find all posts created between April 1st, 2021 and May 1st, 2021, this is how the query would look like:
start_date = datetime.datetime(2021, 4, 1)
end_date = datetime.datetime(2021, 5, 1)
posts = Post.objects.filter(
  created_on__range=(start_date, end_date)
  )
- Important Note: The start date in the
__rangelookup must always come before the end date.
Blog Post Detailed View
In web application, when a list of objects is displayed to the user, they are usually given the option to view each one in detail. So what we will try to do now is to:
- Create the detailed view for a single post
- Link the List Post view to the Detailed Post view so that a use can view a post’s details by clicking on one in the list.
Creating the Detailed View
The detailed view is almost identical to the list view but will differ in the following aspects:
- A lookup value must be specified in the path that will be used to fetch the object. In the case of our blog posts, this will be the slug of the post. This value must be unique.
Post.objects.getis used instead ofPost.objects.filter.getis used to fetch a single object, whilefilteris used to get a list of objects. Usually, only exact lookups are needed with get.- Template file will not need a loop, because a single Post object will be displayed
Let’s add the show_post view to show a single post in detail:
def show_post(request, id):
  obj = Post.objects.get(slug=id)
  context = {
    'post': obj, # The post slot has a single post
  }
  return render(request, "post_detail.html", context)
Notice the show_post view function has an id argument, which means we must also create a path with a matting id pattern. Add the following pattern to blog/urls.py:
path('<slug:id>/', views.show_post),
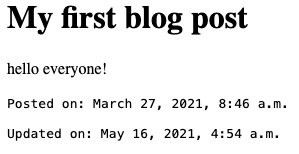
Finally, create the template templates/post_detail.html:
<!doctype html>

<html lang="en">
<head><title>{{ post.title }}</title></head>
  <body>
    <h1>{{ post.title }}</h1>
    <p>{{ post.body }}</p>
    <pre>Posted on: {{ post.created_on }}</pre>
    <pre>Updated on: {{ post.updated_on }}</pre>
  </body>
</html>
Notice how the template doesn’t use a for loop because the show_post view created a post slot in the context that includes only a single post.
Fetching Single Objects
- Just replace filter with get
- get must return a single object (not a list) otherwise it will through an Exception
- For our Post models, the exception classes are:
- Post.DoesNotExist if object was not found
- Post.MultipleObjectsReturned if multiple objects return (not unique)
- For our Post models, the exception classes are:
- Typically use for primary key lookup
Shortcut for Using Get
The get lookup function will fetch a single object and wil throw:
- Post.DoesNotExist if object was not found
- Post.MultipleObjectsReturned if multiple objects return (not unique)
The most common case to dealing with such errors is to display a 404 error in the case of the object not existing and Django provides the shortcut function
get_object_or_404that doesn’t through an error, but displays the 404 page instead. Here is how to use thisget_object_or_404function instead ofgetto achieve the same objective:
from django.shortcuts import get_object_or_404
from .models import Post

def show_post(request, pid):
  context = {
    post = get_object_or_404(Post, pk=pid)
  }
Here is how our detailed view would look like, just make sure you put the correct post slug to view it:
Adding Links from Post List View
Update the template post_list.html, specifically this line:
<li>{{ post.title }}, posted on {{ post.created_on }}</li>
Replace it with this:
  <li>
    <a href="/blog/{{ post.slug }}">
      {{ post.title }}, posted on {{ post.created_on }}
    </a>
  </li>
Change it to make the title only clickable
Result
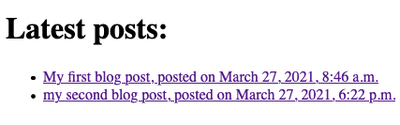
Now you don’t have to remember post slugs as they are now clickable
What we did here:
<a href="/blog/{{ post.slug }}">
If we converted the titles of our posts into links and linked them directly to the detailed view which is /blog/post-slug-here. With {{ post.slug }}, we replace the post-slug-here with the correct slug for our posts from the database. This way if clicked, the title would send you to the correct post.
Final Thoughts
- Making queries documentation(Required Reading!)
- QuerySet reference(See what is available to use)
- Suggested methods to read about:
- exclude, order_by, reverse, count, latest, earliest, first, last, exists
- aggregate and annotate might seem confusing at this time, we will cover them later
- See the slides to see how a search view could be implements
- Read the complex lookup documentation if you would like to use OR/AND logical operators in your queries.
- A complete list of query lookup function can be found in Django’s QuerySet Lookup documentation
Review Questions and Challenges
- Create a view to fetch the list of unpublished posts
- What is the difference between the query lookup functions exact, iexact, contains, icontains?
- How can you lookup posts created:
- on the1st of every month?
- at 2am (any date)
- at 5pm on March 2nd (regardless of the year)
- at 5pm on March 2nd in 2019