Django Forms
A form is an HTML component (or tag) that is used to send user input to the web server or application server. There are two main type that are identical in what they do, but different in how they do it:
- POST forms include data in the body of the HTTP request
- GET forms include data in the url
To send data, forms must always include a submit button that the user would click to perform the send action:
<form action="" method="POST">
  <!-- data input components here -->
  <input type=submit>
</form>
Django Forms
Django provides a form component that manages the creation and handling of HTML forms so we don’t have to create the HTML forms manually. Using Django forms and following the Django rules for using them over manually creating HTML forms has the following benefits:
- Forms will be automatically created for our application for both data creation and update action to reflect our data models. Updating the data models would also automatically update our HTML forms as a result.
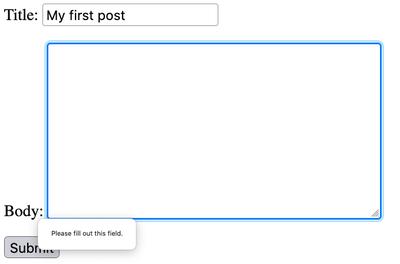
- Django forms will automatically handle input validation to allow users to only enter valid data and show appropriate errors if they don’t without any additional effort from the developer.
- Django forms will also automatically handle data input security instead of leaving it for the developer, which is the biggest challenge in web applications for working with user-submitted data. This will improve the security of the Django web application to ensure it is protected from common attacks (e.g., sql injection, XSS, and CSRF attacks) and will also include any additional security improvements provided by the Django community without additional effort from the developer.
Using Django Forms
- Define forms in forms.py We point the form to the Model it is support to provide data for and any additional rules about the data. The fields will automatically be created by Django based on the model definition.
- Import and create an instance of the form we would like to use in the appropriate view.
- Use render to include the form in the template which must include:
- The HTML form tag
- The {% csrf_token %} inside the form
- The submit button
Defining Form Example
After creating blog/forms.py, this is how the form used to to submit blog post by the user looks like:
from django import forms

from .models import Post

class PostForm(forms.ModelForm): #1
  class Meta: #2
    model = Post #3
    fields = ["title", "body"] #4
Code Explanation:
- line #1: Notice how PostForm inherits from forms.ModelForm and will get all the features and benefits that Django provides in a Form.
- Line #2: This is how configuration information is provided about a class is provided as can be seen in line #3 & #4
- Line $3: We specify the Django model that this form is based on. All the fields and information will be inferred from the the Post model we defined in models.py
- Line #4: This is nn example of additional configuration information specific for the form. We would like the form to only allow the user to input the title and body, and nothing else.
Using Forms in Views to Create Model Objects
Here we created a view specifically for post creation and will use the PostForm to allow users to create Posts:
from django.shortcuts import render, redirect #1

from .forms import PostForm #2

def create_post(request):
  form = PostForm(request.POST or None) #3

  data = {}
  data["form"] = form #4

  if form.is_valid(): #5
    post = form.save() #6
    return redirect("show-post", s=post.slug) #7

  return render(request, 'create_post.html', data) #8
Code Explanatino:
- Line #1: After a post is successfully created, we want to redirect the user to a different view, like post list, so we import the redirect django function that we will use in this view.
- Line #2: The PostForm class must be imported to be used here
- Line #3: This is the most important line in our code where we create an instance of the PostForm that we will use. Remember, in OOP we cannot use a class unless we create an instance of it. Here we are creating an instance of the form.
- User submitted data will always be sent to the view function through the request argument, this is why we must always include this argument in view function so Django can delver user data in the HTTP request. So the
request.Post or Nonepart basically means that we want to create a PostForm using the data coming from the user so the form can validate it, or if there is no data, then create an empty PostForm to display to the user (this is the None part, which means an empty Form)
- User submitted data will always be sent to the view function through the request argument, this is why we must always include this argument in view function so Django can delver user data in the HTTP request. So the
- Line #4: Here we are including the form that we created in the context so we can send it to the template, otherwise it would not be displayed.
- Line #5: Here we are asking the form to validate user input. If the form is empty or has any missing or invalid data, it will return false and so code execution will jump to line #8 to display the form with any errors the user needs to see. Otherwise, the result will be True and the code inside the if statement to create the Post object will be executed.
- Line #6: The form makes it convenient to create and store a Post object in the database using the data submitted by the user. Here we are asking the form to create the Post using the
save()method, which will store it in the database. However, we will also want to store the saved post into a variable so we can use it later in the redirect so we can force the browser to show the newly created post. - Line #7: Here we are using redirect, notice we are giving it the name of the url that we will set as we will see later instead of the path. Paths can get long and hard to remember, so we can give them names in urls.py and ask Django to use them when needed. If you remember, to display a specific post we must specify its identifier, such as the slug. We are telling the render function that we want to orce the browser of the user to show the show-post view and specifically display the post that we just created by speficying the slug of the newly created post.
- Line #8: This is our regular render function. It will display the tempalte that contains the form including any error messages. We always user redirect upon successful creation or completion of the form operation otherwise we can render the template that contains the empty form.
A Note About URL names:
To use the name of the url path with redirect, we must give the paths in urls.py a name:
path('post/<slug:s>/',views.show_post, name="show-post"),
Notice the name="show-post" part in the path, here we just gave the path the name show-post. This name must be unique in our application and no other path can get the same name. It makes it conveneinet to specify in redirect which path we want to sent the client to without having to type the whole path.
Notice also the <slug:s> part in the path, this means that the past must specify the identifier (or slug in our case) of the post that we want to show. This is why in the redirect call earlier we had to include s=post.slug so we can specify the slug of the newly created post in the path and therefore redirect the user browser to show the new post.
What if we wanted to redirect to the post list instead?
First, we need to give the path to show the post list a name:
path('posts/',views.list_posts, name="list-posts"),
Then redirect to this path using it’s name with no need for additional arguments:
return redirect("list-posts")
and that’s it!
Final Steps to Completing the create_post view
Let’s wire the create_post view:
path('create/post/',views.create_post)
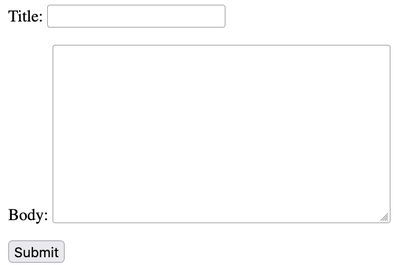
and create the template used by the create_post view that includes the HTML form tag:
<form action="." method="POST">
  {% csrf_token %}
  {{ form.as_p }}
<input type="submit" value="Submit">
</form>
The create_post view is now done and complete. But remember, csrf_token tag must be there for Django to manage security and Django will complain if you forget to include it. You can also replace {{ form.as_p }} with {{ form.as_table }} if you want to change the way the form looks.
Auto-Creating the Value of The Slug Field
There is one problem with our create_post view, the slug field will be empty. We could allow the user to specify the slug value, but it’s better to auto-create the slug from the title of the title provided by the user. Django makes this easy by providing the function slugify which takes a string and converts it into a valid slug. We want to take the title string, convert it into a slug, and store it in the slug field.
To do that, let’s update our create_post code to use slugify. Everything will remain except for a few modifications:
from django.utils.text import slugify #1

from .forms import PostForm

def create_post(request):
  form = PostForm(request.POST or None)

  data = {}
  data["form"] = form

  if form.is_valid():
    post = form.save(commit=False) #2
    post.slug = slugify(post.title) #3
    post.save() #4
    return redirect("show-post", s=post.slug)

  return render(request, 'create_post.html', data)
Code explanation:
- Line #1: We need to import the slugify function that we need to use to convert the title to a slug
- Line #2: We use
commit=Falseoption so that the Post is created but not stored in the database, we store it after we create the slug. - Line #3: Here we are creating the slug from the title, remember the post is created as an object, but not stored in the database.
- Line #4: This is where we store the post in the database after we created the slug.
The result will be as follows:
Using Forms in Existing Views
It is not necessary to create a view specifically for using forms, we can embed forms in existing forms. For example, we can add a form to add comments inside the show-post view.
The CommentForm would look like this:
from .models import Comment

class CommentForm(forms.ModelForm):
  class Meta:
    model = Comment
    fields = ["comment", "author", "email", "post"]
    widgets = { #1
      'post': forms.HiddenInput(), #2
    }
Code explanation:
- Line #1: We are using the widgets option to change how a field is displayed in the browser, remove it and see what happens.
- Line #2: Here we are changing the post field to be a hidden field where the id of the post the comment belongs to is included in the form but not shown to the user. The post field is how a comment is linked to a post in the database and must be included in the form, otherwise Django will not know which post to relate the comment to.
We update show_post to look like this:
def show_post(request, s):
  obj = Post.objects.get(slug=s)
  comments = obj.comment_set.all()
  data = {}
  data["post"] = obj
  data["comment_list"] = comments

  form = CommentForm(request.POST or None, initial={"post":obj.pk} ) #1
  data["comment_form"] = form #2
  if form.is_valid(): #3
    form.save() #4
    return redirect("show-post", s=obj.slug) #5

  return render(request, "post_detail.html", context=data)
Code Explanation:
- Line #1: This is the first addition to the code, everything else remains the same. Here we created a new form instance just like create_post view earlier. However, notice the
initial={"post":obj.pk}argument, here we are telling the form that we want to specify the post we want to link the user to when the form is displayed so that the user would not need to select it. - Lines 2 to 5: Nothing changed here from show_post view, everything is the same.
Additional Notes on Widgets
- Widgets are the UI components used to display on the browser (e.g. buttons, textfields, text areas ..etc.)
- Django will automatically select the appropriate widget for each model field
- We can use widgets field when defining the form to manually choose the widget
- List of available widgets can be found in the Django Form Field Widgets documentation
Update Views
They are identical in every way to the creation views. They even use the same form. The only exception is that we need to specify which object we want to update in the path, and we must load the object and pass it to the form so that the form can display the existing data for the user to edit. For that we wuse the instance argument, and that’s it.
Here is an example of the edit_post view which is almost identical to the create_post view except for three lines:
def edit_post(request, s):
  p = get_object_or_404(Post, slug=s) #1
  f = PostForm(request.POST or None, instance=p) #2

  data = {}
  data["form"] = f
  data["post"] = p

  if f.is_valid():
    post = f.save(commit=False)
    post.slug = slugify(post.title)
    post.save()
    return redirect("show-post", s=post.slug)

  return render(request, 'edit_post.html', data) #3
Code Explanation:
- Line #1: We load the post we want to edit from the database.
- Line #2: Notice we use
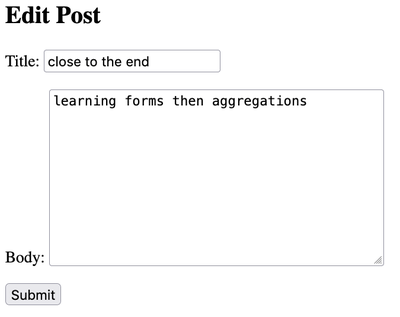
instance=pto give the form the data from the database. The form will include the data from the database into the form when showing it to the user so they can edit it and everything else remains the same. - Line #3: We are using a different template to change the titles, but the form is exactly the same.
When the form is shown to the use, you can see that the existing data will be included in the form:
The Deletion View
No Django form or template is needed to delete an object. Just a path that specifies the object to be deleted and redirecting to a different view upon success. Here is how the deletion view would look like:
def delete_post(request, s):
  p = get_object_or_404(Post, slug=s)
  p.delete()
  return redirect('list-posts')
The path must specify the object we want to delete, so in the case of posts we include the slug:
path('delete/post/<slug:s>/',views.delete_post),
That’s it!
While this deletion view does the job, it is not recommended that we delete objects without a confirmation screen to prevent accidental deletion of data. For that, we create a template that includes an HTML GET form to serve as the confirmation step, without using Django forms.
This is how the confirmation form would look like, let’s call it confirm.html:
<h2>{{ message }}</h2>
<form action="." method="GET">
  <input type="submit" name="confirm" value="Confirm">
  <input type="submit" name="cancel" value="Cancel">
</form>
Important notes about confirm.html:
- Notice we use a GET form without Django forms
- We add two input buttons with a name attribute
- The name attribute is used in our conditions in the view
- The value attribute is the label displayed on the buttons
- We also include a
{{ message }}variable that allows us to customize the confirmation message displayed to the user.
So let’s update the deletion view to take advantage of the confirmation screen:
def delete_post(request, s):
  p = get_object_or_404(Post, slug=s) #1
  m = f" Delete post {p.title}?" #2
  data = { #3
    "message": m,
  }
  if "confirm" in request.GET: #4
    p.delete()
    return redirect('list-posts')
  elif "cancel" in request.GET: #5
    return redirect('list-posts')

  return render(request, "confirm.html", context=data) #6
Code explanation:
- Line #1: We load the object to be deleted from the database
- Line #2: We construct the confirmation message to be displayed to the user, which can include the title of the post.
- Line #3: We construct the context and include the message in it.
- Line #4: If the user submitted and GET data that contains the word “confirm”, which is included in the name part of the GET form in
confirm.html, then the user has confirmed deletion and Django is instructed to delete the post and client is redirected to the post list. - Line #5: If the user submitted GET data contained the word “cancel” from clicking the submit button with the name “cancel”, then client is redirected to post list without deleting the post
- Line #6: Otherwise, user has yet to select anything, so display the confirmation template.
Final Thoughts
- List of available widgets can be found in the Django Form Field Widgets documentation
- User should not remember paths to a web application
- Instead, add links to views to allow users to select which view to run
- The url template tag is useful in creating links
- If a view is not linked, then the user cannot get to the view
- Views should now exceed 3 clicks deep, preferably 2 at most
Review Questions and Challenges
- What are forms? How are Django forms useful?
- What are the main form types and how are they different?
- How is an update form different from a creation form?
- Why is a confirmation screen important in delete operation?
- Can we use HTML forms without Django forms? Can you give an example of where this is done?