Templates
This section assumed that you have an introductory understanding of HTML. Please read the following introduction to HTML if you haven’t worked with HTML before. You will also a quick HTML tag reference in the views section.
Templates are just strings. They are very similar to fstrings in Python, but much more sophisticated. If you remember with fstring, we can have string placeholders where python would plugin values from variables:
my_name = "Mohammad"
greeting = f"Hello {my_name}"
print(greeting)
# Output: Hello Mohammad
Whatever the value contained in my_name, it will be placed by python in the slot {my_name}. Its a way to easily construct dynamic strings. Well templates are exactly just that. But instead of working simple short strings, templates are designed to be used with HTML files, which are just very long strings.
We used fstrings in the previous section on views to construct dynamic HTML. However, it was not very elegant to have HTML and python code in the same file. Furthermore, it would be very inconvenient for designers to work on fstrings. This is where Django templates are truly useful. Templates separate HTML text into their own .html file away from python code. In the view function, we just instruct Django which template file to use. Because template files are .html files, designers can use the tools they are accustomed to, to design the page. Developers can build minimal templates to get the web app working, then replace them with the well designed files provided by the designers.
Using Templates
The easiest way to use templates in Django is to use the render function to construct the HttpResponse for the view function. The render function take a dictionary which contains the data to be displayed and the name of the template file it is to be displayed in and combines them to produce an HttpResponse containing the proper HTML content.
Because the render function is so useful, it is already imported for you in views.py when you create your app:
from django.shortcuts import render
At the end of the section on views, we constructed a test_view function that used HTML and fstrings that looked like this:
from django.http import HttpResponse

def test_view(request):
  name = "Mohammad"
  return HttpResponse(f"""
  <html>
    <body>
      <h1>Hello {name}!</h1>
      <p>This is my first <strong>html</strong> web app!</p>
    </body>
  </html>
  """)
Now let’s update test_view to use the render function and take advantage of Django templates. Here is how the updated test_view would look like:
def test_view(request): #1
    data = {} #2
    data["my_name"] = "Mohammad" #3
    return render(request, "hello_world.html", context=data) #4
Code explanation:
- Line #1: The render function is used within view function to construct the returned HttpResponse (see line #4)
- Line #2: Here we are creating an empty dictionary where we will put all the data that will be used in the template. This dictionary is known as the context and will be used to populate and construct the HTML page with data.
- Line #3: This is the data we are including in the context. Notice we created a slot named
my_name, this slot will hold the string value"Mohammad". Themy_nameslot will be converted into a template variable that is also namedmy_nameand will contain the same data. - Line #4: We are using the render function which takes 3 arguments:
request: this is the http request from the view function, it must be passed as the first argument to render.hello_world.html: this is the name of the template file which must be placed in thetemplatesdirectory inside the app directory.context=data: This is an optional argument where we are giving the render function the context data that it will combine with thehello_world.htmltemplate file.
What is missing now is to create the template file hello_world.html inside the blog app directory. So first we must create the directory templates inside the blog app directory. Remember, python is case sensitive, so templates must be named exactly that and in lower case. Inside templates, create an empty file called hello_world.html. Now, you will have the file blog/templates/hello_world.html which should be updated to look like this:
<html>
  <body>
  <h1>Hello {{ my_name }}!</h1>
  <p>This is my first <strong>html</strong> web app!</p>
  </body>
</html>
Notice how this is just an regular HTML file. However, pay attention to this line:
<h1>Hello {{ my_name }}!</h1>
Specifically, notice the {{ my_name }} part. This is known as a template variable. Here we are telling the Django template to take the value in the context slot named my_name and put it in this slot. Remember in test_view we defined the context to hold the value Mohammad in the slot my_name. So now, if we run our application, this is how it would like like:
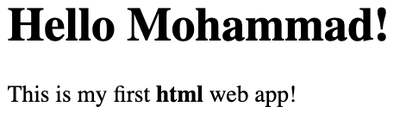
As you can see, the result is the same as the previous test_view but what changed is the following:
- Now the HTML is in a separate file from the python code, this allows for division of labor. Designers can work on the HTML files and programmers can work on the python files.
- We will see next that the templates are more powerful that fstrings and provide much more useful features.
- It is possible to reuse a template. So this same file could be used in multiple view function, provided they use the same names for the context variable slots.
Other Useful Template Features
Template Tags
Template tags are placed inside the tags {% %} and are useful to performing actions within templates. Here are some useful tags that you need to learn about and will likely use:
The for tag
The for tag is used to look over a template variable that contains a list. If for example our view function was updated to look like this:
def test_view(request):
    data = {}
    data["my_name"] = "Mohammad"
    data["guests"] = ["Khaled", "Ahmed", "Sara", "Ali"] #1
    return render(request, "hello_world.html", context=data)
Code explanation:
- Line #1: This is the only change we made to the function where we added a new slot in the context names
gueststhat contains a list of names. The way we would display this data in the template is to add the following code into thehello_world.htmltemplate"
<ul>
    {% for g in guests %}
        <li>
            {{ g }}
        </li>
    {% endfor %}
</ul>
Code explanation:
- The
<ul></ul>tag: is used to construct the unordered list. Notice how is is placed outside the for loop because we don’t want the tag to be repeated and need only a singleulin our page. - The
{% for g in guests %}is the for loop template tag. It is identical in syntax to the python for loop but will require an{% endfor %}tag to determine what the for will repeat. Anything betweenforandendfortags will be repeatedly display in HTML and as many as the number of elements in the listgueststhat we are looping. - The
<li></li>tag: This is the list item tag, since it is betweenforandendforand we have 4 names inguests, then thelitag and everything inside it will be repeated 4 times. - The
{{ g }}: This is a template variable which is also the for loop variable. With every loop it will contain a different name from the listguests, starting withKhaledand ending withAli. - The
{% endfor %}template tag: You cannot useforin a Django template without a matchingendfor. In HTML files, remember that spaces have no meaning, unlike python where spaces have meaning and we always indent for loop instructions to know which instructions are part of the loop. We cannot do that in HTML files so we have to put theendfor to know which commands or tags we want repeated with the loop.
if tag
In the same way we used the for tag in templates, we can also use the if tag in templates as well. It also follows the exact same syntax as python but will require a matching endif tag. Everything you know about python if statement also applies here, including conditions, elif and else.
Template Filters
Template filters are just a way to change the appearance of data in the template variables. Here is an example of its use:
<h1>Hello {{ my_name|upper }}!</h1>
Notice how we used pipe operator | inside the template variable tags {{ }} and directly behind the variable name without any space. Then we put the name of the filter upper directly after the pipe also without spaces. This template tag will ensure that the data in my_name is always displayed in upper case.
You can perform much more with filters and control how the data is presented. To learn more and discover other filters, check the Django template filter documentation.
Final Thoughts
- Remember that templates are used to change how the web page looks. If a change is required in how the website or data looks like, the change will be made in the template file.
- Everything else you learned about Django just remains the same. The only part that we updated in this section is instead of returning an HttpResponse object, we use render to construct an HTML page from context data.
Review Questions and Challenges
- What is the render function and what are its main arguments?
- Create a view that create a context containing a list of programming languages as strings. Then create a template to display this list as an unordered list then an ordered list.
- What is a template filter? cna you name some useful filters?
- What is the
|operator called? Why do we use it in templates? - Update the current app to take advantage of some of the available filters in Django.