Building Application Views
A view refers to the webpage in a web application that implements a functionality. If you are to open any webpage you currently use, (e.g., talabat.com) then you will notice that every page will have a specific task to perform. For example, there is a cart page, a purchase page, a restaurant listing page, a food menu page ..etc. Each of these pages is called a view.
Similarly with our blog app, almost every requirement will have a corresponding view. The views for creating posts is currently implemented using the Django admin. However, we would like to create views for the users of our blog website to use. Our end goal is to create a view that lists the blog posts for our blog readers and allow them to choose which post they want to read. However, we will first explain how views are constructed in Django.
To construct a view using Django, a developer must complete the following tasks:
- Create a view function in the apps views.py file
- Link the view function to a url path in the root urls.py
- Optionally, create a template that hold the design of the view
View Functions
From the steps of constructing a view, you can tell that a view function is part of constructing a view. It holds the code that brings everything together. Some of the tasks that can be performed in a view function include:
- Loading and storing data using Django models
- Accepting and validating input from user
- Loading the correct templates and combining them with proper data
- Authenticating users
- and much more …
The list is not exhaustive, but serves to illustrate that coding is done mainly in the view function.
While view function can serve many purposes, they are required to perform at least 2 major tasks:
- Receive an HTTP Request
- Return an HTTP Response
After receiving the HTTP request, you can design your view function to perform any of the tasks mentioned earlier. When done, it must always return an HTTP response. Failure to accept responses or return a response will result in an application error.
Example View Function
Let’s construct an example view function to understand how view function work.
First step is to write the view function. Open blog/views.py and add the following code:
from django.http import HttpResponse #1

def test_view(request): #2
  return HttpResponse("Hello World!") #3
Code explanation:
- Line #1: Django provides libraries and tools to make working with HTTP protocol easier. Here we have imported an HttpResponse class that we will return at the end of the view function, because that is required in any view function.
- Line #2: Here we defined a view function. As can be see, it is just a python function. We named the function
test_viewand the function takes the argument request. The django webserver will run this function if a request for it is received from a web browser. The Django server will use the request argument to deliver the HTTP request to the view function, where we can write code to process it. Failure to include the request argument will result in an application error. - Line #3: Here we re performing the second requirement of a view function, which is to return an HttPResponse object. The HttpResponse is used to deliver content to the browser that requested opening this view. Here we are simply including the message
Hello World!which the browser will display once it receives it.
Second step is to link the newly created test_view function to a url path. For that you need to edit the root urls file found at mysite/urls.py to look like this:
from django.contrib import admin
from django.urls import path
from blog.views import test_view #1

urlpatterns = [
    path('admin/', admin.site.urls),
    path('test/', test_view), #2
]
Code explanation:
- Line #1: You have to import the test_view function which is found in
blog/views.py. Because the current urls.py is in the directorymysiteand views.py is inblog, we have to use absolute importing. So we import fromblog.viewsso that Django would know to look inblog/views.pywhere it will findtest_view. - Line #2: Notice we added a path() entry to
urlpatternslist. This is how we add paths to our Django webapp. We give path() two arguments, the first one is the path we want to assign and the second is the view function we want to assignt it to. Here we have configured our web app such that if a browser requests the path/test/, then Django will send the HTTP Request to test_view and return the generated HTTP Response from test_view back to the browser.
Using HTML
We now know how to display text in browsers, but for webapps to be really useful we need to deliver HTML web pages to the browser. Since HTML is just text, we can construct HTML webpages using python strings. Update the test_view function to look like this:
from django.http import HttpResponse

def test_view(request):
  return HttpResponse("""
  <html>
    <body>
      <h1>Hello World!</h1>
      <p>This is my first <strong>html</strong> web app!</p>
    </body>
  </html>
  """)
Notice how by improving the function the application that we view in the browser has improved. But this is still static HTML, to make it more dynamic we can take advantage of python fstrings:
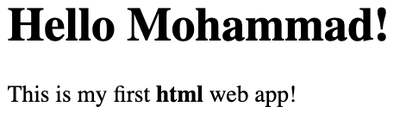
from django.http import HttpResponse

def test_view(request):
  name = "Mohammad"
  return HttpResponse(f"""
  <html>
    <body>
      <h1>Hello {name}!</h1>
      <p>This is my first <strong>html</strong> web app!</p>
    </body>
  </html>
  """)
Notice how we created a placeholder in the HTML string for the variable name. Whatever content is in the variable name will be included in the HTML string. The name in the variable could be read from a file or database, or asked from the user. This way as different user open the same view, they will see a page showing a different name. This is the main idea of how to turn static html into dynamic. It is simply to construct HTML strings on the fly and changing it based on data stored in variables in our application. The end result looks like this:
Quick HTML Reference
While we will not focus on designing HTML pages, we will need to use some basic HTML tags to construct useable webapps. These tags are:
Anchor (a)
The <a> or anchor tag is used to create links like this link. The syntax to create an HTML link is:
<a href="http://google.com">The Link</a>
Here The Link is the text that will be converted into a link. The page it will send the browser to is determined using the href property inside the <a> tag. Here the link will send the browser to google.com.
Heading (h1 - h4)
These <h1> to <h4> tags are used to create headers. This is how to use them:
<h1>Heading 1</h1>
<h2>Heading 2</h2>
<h3>Heading 3</h3>
<h4>Heading 1</h4>
This is how they would look like:
Heading 1
Heading 2
Heading 3
Heading 1
Division (div)
The <div> tag is used to break the content of a page into sections. To determine which part is a menu, which part is a header, which part is a footer, we typically use the <div> tag. Using it requires understanding of CSS which we will not cover in this course. But for a simple introduction to the topic, this instructables article on the basics of div website should be a good start. Also, as we mentioned how web technology is constantly improving, the following article introduces new HTML standard tags used specifically to structure HTML pages using standard structuring elements.
Paragraph (p)
As the name suggests, <p> breaks text into paragraphs. You might have noticed that browsers ignore any whitespace in HTML, so adding a newline does not translate into the browser adding a newline to the webpage. To break sentences or paragraphs into their own lines, use the <p>.
Unordered Lists (ul)
The <ul> tag is used to list items. Each item must be surrounded by a list item tage <li>:
<ul>
  <li>first item</li>
  <li>second item</li>
</ul>
You can add as many list items in the unordered list as you like. The list will look like this:
- first item
- second item
Ordered Lists (ol)
Ordered lists are identical to unordered list in everyway, except how they look. This is how an ordered list looks like:
- first item
- second item
Creating one is similar to creating an unordered list, just use <ol> instead of <ul>:
<ol>
  <li>first item</li>
  <li>second item</li>
</ol>
Tables (table)
One of the most useful and likely complex to use. As the name suggests, it organizes data in a table format. Keep the following in mind when using the <table> tag:
- The table is row major, you must first add table rows using
<tr>tag for each row of data. - Tou add data inside the table row
<tr>tag using the table data<td>tag. - Depending on the order of the
<td>tag, it will correspond to the column number in the table. - If you want to change the formatting of the data into a header, use
<th>instead of<td>
Here is an example:
<table>
  <tr>
    <th>Column 1 (header)</th>
    <th>Column 2 (header)</th>
  </tr>
  <tr>
    <th>row 1 item 1 (header)</th>
    <td>row 1 item 2</td>
  </tr>
  <tr>
    <td>row 2 item 1</td>
    <td>row 2 item 2</td>
  </tr>
</table>
This is how the table would look like:
| Column 1 (header) | Column 2 (header) |
|---|---|
| row 1 item 1 (header) | row 1 item 2 |
| row 2 item 1 | row 2 item 2 |
The table here uses the current website’s CSS styling. If you test it with your Django application you will likely see a very basic table. To format the table and add lines and color, we will have to use CSS. I would recommend you get familiar with bootstrap css framework that makes creating simple and good looking webpages easy for developers. You can optionally read the following introduction to bootstrap.
Review Questions
- What are the steps to building a view in django?
- What are the main requirements in every view function?
- What does the render function do? what are the main arguments it accepts?
- Why isn’t it a good idea to mix python code and HTML in the same file?
- Why don’t we run makemigrations and migrate after creating a new view function?