ISOM 350
Business Application Development
Mohammad AlMarzouq
Django Forms
What Are Forms?
- HTML component
- Used to send user input to server
- POST forms include data in the body
- GET forms include data in the url
- Submit button is needed to perform send action
<form action="" method="POST">
  <!-- data input components here -->
  <input type=submit>
</form>
What is the Role of Django Forms
- Manages the creation of the data input components
- Template must still include the form and submit tags
- Can Auto generate forms based on models definition
- Manages security of forms
- Data submission in web apps is very risky
- Tries to prevent exploits such as sql injection, XSS, and CSRF attacks
- Handle input validation
Using Django Forms
- Define forms in forms.py
- Very similar to models
- Use forms in views that accept user input
- Standard steps to using forms
- Include the form in our template inside the form tag
- Add also {% csrf_token %}
Updating Blog App to Use forms
- We would like to create a view that enables writing a blog post and avoid using the Django admin
- This view is a data creation view (from CRUD)
- It allows for the creation of posts
- So we define a form that allows the user to enter data needed for a post
The Post Model
class Post(models.Model):
  title = models.CharField(max_length=200, unique=True)
  slug = models.SlugField(max_length=200, unique=True)
  body = models.TextField()
  created_on = models.DateTimeField(auto_now_add=True)
  updated_on = models.DateTimeField(auto_now=True)
  status = models.IntegerField(choices=STATUS, default=0)
- User will post the title and body.
- Slug is auto-generated from title
- Status is unpublished by default
- Dates are auto-inserted
The Post Form
- Create blog/forms.py:
from django import forms

from .models import Post

class PostForm(forms.ModelForm):
  class Meta:
    model = Post
    fields = ["title", "body"]
The PostForm
- Notice how PostForm inherits from forms.ModelForm
- A model form is a Django form based on a Django model
- We set the model as Post
- Django will choose best input components based on the model field types
- in the fields attribute, we are telling Django what input the user will provide
- In this case it is title and body
First Without Auto-Creating The Slug Field Value
The create_post View
from django.shortcuts import render, redirect

from .forms import PostForm

def create_post(request):
  form = PostForm(request.POST or None)

  data = {}
  data["form"] = form

  if form.is_valid():
    post = form.save()
    return redirect("show-post", s=post.slug)

  return render(request, 'create_post.html', data)
from django.shortcuts import render, redirect
- Notice we have imported the redirect function
- Used like render
- Forces the browser to open a specific page
- We will need to give urls paths names for easy referral
from .forms import PostForm
- We must import the PostForm we created in forms.py
form = PostForm(request.POST or None)
- Here we are creating the form
- Notice the argument is request.POST or None
- It means if there is data coming from the client, give it (bind it) to the form
- The form will allow us to validate the data
- Otherwise, create an empty form
- It means if there is data coming from the client, give it (bind it) to the form
  data = {}
  data["form"] = form
- We are putting the form in the context to deliver it to the template
- It will be displayed in the template
  if form.is_valid():
    post = form.save()
    return redirect("show-post", s=post.slug)
  return render(request, 'create_post.html', data)
- The if statement will only be true if Django receives valid data from the client
- form.save() used to create a new post from the submitted data
- Redirect will send the client to the show-post view
- The create_post.html template is only shown is data is not valid or empty
return redirect("show-post", s=post.slug)
- For redirect to work we must give our paths in urls.py names:
path('post/<slug:s>/',views.show_post, name="show-post"),
- We gave the show_post path the name
show-post - Can be any name but must be unique for redirect to find the path
- The second argument in redirect
s=must match the name of the slug pattern s in the path
Redirecting to Post List
- Much easier since there is no argument needed to list post.
- Just give the post list view a name:
path('posts/',views.list_posts, name="list-posts"),
- Then redirect to this path using it’s name with no need for additional arguments:
return redirect("list-posts")
Updated urls.py
- Add the following entry to wire the view in urls.py:
path('create/post/',views.create_post)
The create_post.html Template
<form action="." method="POST">
  {% csrf_token %}
  {{ form.as_p }}
<input type="submit" value="Submit">
</form>
- We must include the form (with action and method) and submit button
- csrf_token tag must be there for Django to manage security
- {{ form.as_p }} displays each component of the form inside a p tag
- Try also {{ form.as_table }}
- The create_post view is complete
- Problem is we did not provide a slug for the posts
- This will create problems, so we must modify our code
Now With Auto-Creating The Slug Field Value
The create_post View
from django.utils.text import slugify

from .forms import PostForm

def create_post(request):
  form = PostForm(request.POST or None)

  data = {}
  data["form"] = form

  if form.is_valid():
    post = form.save(commit=False)
    post.slug = slugify(post.title)
    post.save()
    return redirect("show-post", s=post.slug)

  return render(request, 'create_post.html', data)
The Update
- Everything remained the same except this part:
  post = form.save(commit=False)
  post.slug = slugify(post.title)
  post.save()
post = form.save(commit=False)
- Here a post object was created but was NOT stored in the database
- This allows us to modify the data in the object
  post.slug = slugify(post.title)
  post.save()
- Here we modify the slug field by slugifying the title
- We imported the slugify function that converts any string into a slug
- Then we save the post in the database
The Result

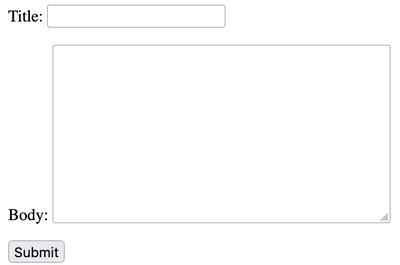
Here is the create post view with the form
The Result

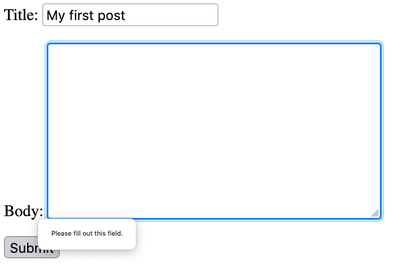
Forms will ensure input data is valid and give appropriate errors automatically
- Upon successful submission of data, the browser will be redirected to the newly created post
- Because we used redirect instead of render
- Can you modify the view to redirect to the post list instead?
Using Form in Existing Views
- Forms can also be used in existing views
- Let’s add a comment form to the show_post view
- Which allows readers to write comments
Creating The Form
- Update blog/forms.py:
from .models import Post, Comment

class CommentForm(forms.ModelForm):
  class Meta:
    model = Comment
    fields = ["comment", "author", "email", "post"]
    widgets = {
      'post': forms.HiddenInput(),
    }
- Explain what’s going on
- widgets allows us to change how a field will be displayed in a form
- Remove it and see what happens
Updating show_post View
def show_post(request, s):
  obj = Post.objects.get(slug=s)
  comments = obj.comment_set.all()
  data = {}
  data["post"] = obj
  data["comment_list"] = comments

  form = CommentForm(request.POST or None, initial={"post":obj.pk} )
  data["comment_form"] = form
  if form.is_valid():
    form.save()
    return redirect("show-post", s=obj.slug)

  return render(request, "post_detail.html", context=data)
The Changes
- Everything remained the same except this part:
  form = CommentForm(request.POST or None, initial={
    "post":obj.pk
  })
  data["comment_form"] = form
  if form.is_valid():
    form.save()
    return redirect("show-post", s=obj.slug)
- You should be able to explain what is happening here
Setting The ForeignKey
- Because a comment must be related to a post, we give the form the primary key value of the post using initial argument:
form = CommentForm(request.POST or None, initial={
  "post":obj.pk
  })
The Initial Argument
- Accepts a dictionary
- Will match keys to field names in the form
- Will use matching value to populate the fields with an initial value
- Used to set ForeignKeys or the value of any other field
- Can set the values of multiple fields as a time
- Just include more key-value pairs in the dictionary
Widgets
- Widgets are the UI components used to display on the browser
- Django will automatically select the appropriate widget for each model field
- We can use widgets field when defining the form to manually choose the widget
- List of available widgets can be found in the Django Form Field Widgets documentation
Updating Views
- Similar to creation view in every way, except:
- Will show existing data
- Allows you to update the data for a single object
- Will require the primary key for the object to be updated
- Uses the same form as the creation view
- Must load the object and pass it to form using
instanceargument
- Must load the object and pass it to form using
- Will require a new view, template and url path
Reminder of the create_post view
def create_post(request):
  form = PostForm(request.POST or None)

  data = {}
  data["form"] = form

  if form.is_valid():
    post = form.save(commit=False)
    post.slug = slugify(post.title)
    post.save()
    return redirect("show-post", s=post.slug)

  return render(request, 'create_post.html', data)
The New Edit Post View
def edit_post(request, s):
  p = get_object_or_404(Post, slug=s)
  f = PostForm(request.POST or None, instance=p)

  data = {}
  data["form"] = f
  data["post"] = p

  if f.is_valid():
    post = f.save(commit=False)
    post.slug = slugify(post.title)
    post.save()
    return redirect("show-post", s=post.slug)

  return render(request, 'edit_post.html', data)
- Very similar to the create_post with a few exceptions
- Dont’ forget to import get_object_or_404
What Changed?
First Change
def edit_post(request, s):
- The name of the view function
- Added an argument that holds the identifier of the Post we will edit
- It will be a slug in this case
Second Change
  p = get_object_or_404(Post, slug=s)
  f = PostForm(request.POST or None, instance=p)
- Instead of creating an empty form, we must first fetch the object we want to edit
- Then we create the form object and pass the object we want to edit using the instance argument
- This will put the data in our form and update it when we call the save() method of the form
- It is very different from initial
- initial is only used for creating objects
Third Change
  data = {}
  data["form"] = f
  data["post"] = p
- Include the post object in the context in case we need it in the template
Finally
return render(request, 'edit_post.html', data)
- We use a different template in case we want to show different information in the edit screen
- It is possible to reuse the create template
The edit_post.html Template
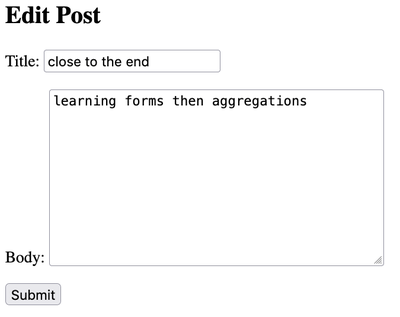
<h2>Edit Post</h2>
<form action="." method="POST">
  {% csrf_token %}
  {{ form.as_p }}
<input type="submit" value="Submit">
</form>
- Almost identical to the create_post.html template
- A different template gives you the freedom to change what is displayed to the user in the edit screen
Adding The URL Path
- Finally, we add the following url path to blog/urls.py and our edit view is read:
path('edit/post/<slug:s>/',views.edit_post),
The Result

The Post Deletion View
- No form is needed to delete an object
- It is recommended however that a confirmation form is added
- The object to be deleted is specified in the url
- View deletes the object and client redirected to another page
- No template required unless there is a confirmation page
Deletion View Without Confirmation
- Create the view:
def delete_post(request, s):
  p = get_object_or_404(Post, slug=s)
  p.delete()
  return redirect('list-posts')
Then add the path:
path('delete/post/<slug:s>/',views.delete_post),
That’s it!
Now With a Confirmation Step
Just Create A Template
- Will have an HTML GET form with two inputs in confirm.html template:
<h2>{{ message }}</h2>
<form action="." method="GET">
  <input type="submit" name="confirm" value="Confirm">
  <input type="submit" name="cancel" value="Cancel">
</form>
About confirm.html Template
- Notice we use a GET form without Django forms
- We add two input buttons with a name attribute
- The name attribute is used in our conditions in the view
- The value attribute is the label displayed on the buttons
- The message variable will be set by the view to display an appropriate confirmation message
- Allows for changing the message for deleting objects other than posts
Now Update The View To Add Confirmation
def delete_post(request, s):
  p = get_object_or_404(Post, slug=s)
  m = f" Delete post {p.title}?"
  data = {
    "message": m,
  }
  if "confirm" in request.GET:
    p.delete()
    return redirect('list-posts')
  elif "cancel" in request.GET:
    return redirect('list-posts')

  return render(request, "confirm.html", context=data)
First Change
  m = f" Delete post {p.title}?"
  data = {
    "message": m,
  }
- The message template variable is created which will hold a confirmation message
- This will allow us to modify the message for deleting objects other than Posts
Second Change
  if "confirm" in request.GET:
    p.delete()
    return redirect('list-posts')
  elif "cancel" in request.GET:
    return redirect('list-posts')
  else:
    return render(request, "confirm.html", context=data)
- Deletion is now conditional on the request GET variable:
- If
confirmwas selected, then object is deleted and user redirected - If
cancelwas selected, then object is NOT deleted and user redirected - Otherwise, render confirm.html template
- If
The Confirmation Form is Generic
- It’s not specific to delete Post object
- You can use the template to confirm any delete operation
- Just set the confirmation message you want to show
Final Thoughts
- User should not remember paths to a web application
- Instead, add links to views to allow users to select which view to run
- The url template tag is useful in creating links
- If a view is not linked, then the user cannot get to the view
- Views should now exceed 3 clicks deep, preferably 2 at most